Whitepapers On Whiteboard
 O-Ring Installation Guide
Video Transcript
Today we are going to talk about best practices for o-ring installation:
- Pre-checks and verifications
- How you want to lubricate your o-ring
- How you want to install
- Post-checks and verifications
-
Pre O-ring Installation Preparation
- Visual Examination – First, you’ll want to do a good visual inspection of the o-ring and the other components.
- Measurement Verification - Make sure you have the correctly sized o-ring that’s been specified as well as the other components that it’s going to be installed into (like the gland).
- Cleanliness - Make sure everything is clean so that you don’t introduce any contamination into the system that could cause leakage later.
- Avoid Damage - Make sure that none of your metal components and o-ring have been damaged.
-
O-ring System Design
For o-ring system design you’ll want to do some basic checks.
- Make sure the applicable standards for your system application have been followed for percent stretch, squeeze, volume fill and extrusion gap.
- Make sure you select an o-ring material appropriate for the application.
- Follow applicable standard for surface finishes.
- Check to make sure the components that the o-ring is going into don’t have any nicks, burrs, scratches or sharp edges that can damage the o-ring during installation and operation.
- It is also important to make sure components have the correct lead-in chamfer to make the o-ring installation easier and prevent damage to the o-ring.
-
O-Ring Lubrication
Why is lubrication an important step when installing an o-ring?
- It helps reduce surface friction.
- Creates a smooth transition for the o-ring as you slide the o-ring into the groove.
- Helps prevent the o-ring from being damaged. There is a tendency for abrasion, pinching, or cutting.
- Helps to get the o-ring seated properly in the groove so that it’s in the right position and evenly spaced.
- Helps speed up assembly operations
What are important considerations when selecting lubrication for o-ring installation?
-
Selection of an appropriate Lubricant
- Make sure it’s compatible with the o-ring material and compatible with the overall system fluid
- The lubricant should not soften or solidity over the service temperature range
- Lubricant should not break down and leave gummy or gritty deposits which could contaminate the system
- Lubricant should pass through any filter used in the system
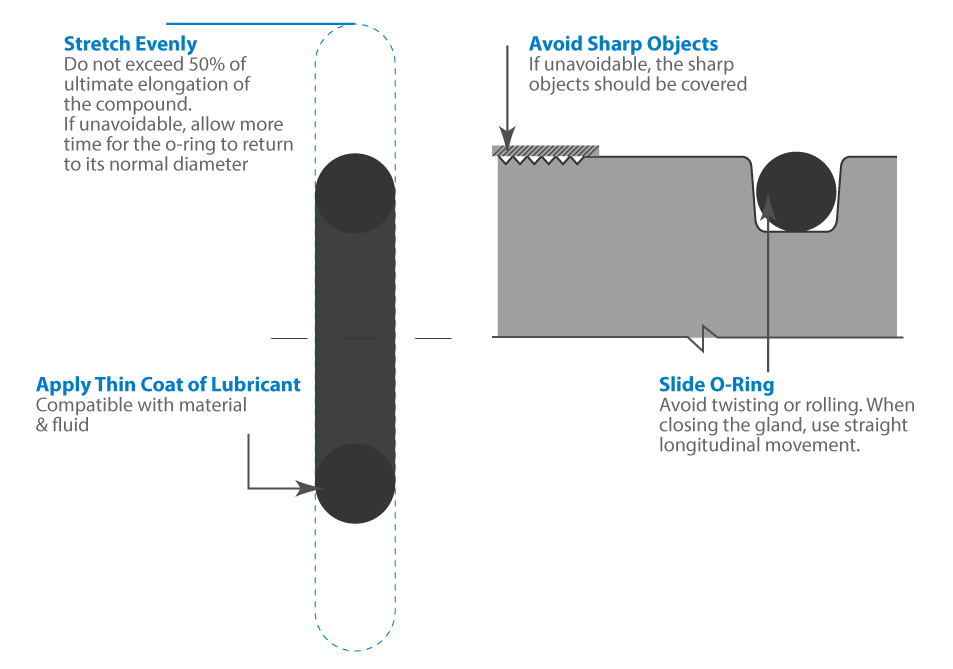
- Uniformly apply a thin coating of lubricant to the o-ring
-
O-Ring Installation Techniques
- Stretch the O-ring Evenly - Rule of thumb is to not exceed 50% of the ultimate elongation of the o-ring compound. If it needs to exceed, allow more time for the o-ring to return to its normal diameter.
- Avoid Sharp or Pointed Objects – Generally, avoid moving the o-ring over threads, keyways, slots, splines and ports. If unavoidable, cover the sharp objects with a sleeve, tool, or tape to prevent damage.
- Alignment & Centering - Make sure you are sliding the o-ring during installation. Avoid twisting or rolling which could lead to improper seating in the groove. When closing the gland, make sure to use straight longitudinal movements (again, twisting could cause bunching, misalignment, pinching, or cutting.
-
Post O-Ring Installation Verification
-
Visual Inspection of the O-Ring
- Is it properly seated in the groove?
- Has it returned to its normal size?
- Is it free of twisting or damage?
Those are some basic, common-sense, best-practices for o-ring installation.